1. What type of battery does AK series use? How to install the batteries?
There are 4 pcs 18650 Lithium-ion batteries (INR) in the package. Please put the batteries in with the
guidance of following picture. Please note that Battery polarities must be correctly installed.

2. How to charge the batteries? Can I charge them from the USB port?
AK series is not able to be charged via USB cable and power source. Please charge the batteries with
separate charger comes with the gimbal. It takes about 5 hours to fully charge the batteries with a 5V/3A
charger. The indicator on the charger is red when charging, and it turns to green when fully charged.
3. Is there any notes for the batteries in usage and storage?
1) Please use the batteries we provided with AK series gimbals. Feiyu Tech will not be responsible for
the issues caused by any other batteries which are not supplied by Feiyu Tech.
2) The batteries come
with AK series gimbals are marked INR on the body. The batteries which are marked IMR on the body for a
series is not applicable with AK series.
3) When the batteries are not used for a long time, please
take them out and store them properly.
4) The battery life of gimbal depends on the one which has the
lowest voltage, so please fully charged all the batteries before using.
5) An acceptable range for
temperature conditions is from -10℃ to 55℃, higher than 55℃ may catch fire, lower than -10℃ may affect
the performance of battery.
6) Please DO NOT use and charge a swollen, leaking or damaged battery. If
there is something wrong with the battery, please contact technical support of FeiyuTech or the seller
you bought from to deal with it.
7) Please DO NOT place the battery with some metal objects, such as
coin, key, or necklace. If two poles of a battery contact with metal objects, it may catch fire.
4. How long does the battery last on AK Series?
AK series gimbal has a run time of up to 12 hours on the premise that gimbal is perfectly balanced
before powering on. There's variation in run time according to condition of Usage, especially at low
temperatures it is greatly affected.
5. Which camera models does AK4000 work with?
Payload: 150g/0.33lb --- 4000g/8.8lb (lens and other accessories are included, and center of gravity of
gimbal is balanced ).
Part of cameras & lenses tested:
1) Canon 5D Mark III/ IV/ 6D/ 80D and
other cameras with similar dimensions and weight Lenses: Canon EF 24-105mm f/4L IS USM, Canon EF 24-70mm
f/2.8L USM, Canon EF 16-35mm f/2.8L II USM, Canon EF 17-40mm f/4L USM, Canon EF 35mm f/1.4L II USM, Canon
EF 100mm f/2.8L IS USM Macro Lens + lens hood, Canon EF 85mm f/1.2 L II USM + lens hood, Canon EF 50mm
f/1.2L USM (focus ring is stuck on lens support frame, only works in AF)
2) Canon 1D X Mark II
Lenses:
Canon EF 35mm f/2 IS USM + lens hood, Canon EF 85mm f/1.2 L II USM+ lens hood, Canon EF 135mm f/2L USM+
lens hood, Canon EF 100mm f/2.8L IS USM Macro Lens + lens hood
3) Sony α7/ α9 series
Lenses: Sony
FE 16-35mm f/4, Sony FE 24-105mm f/4 G OSS, Sony FE 12-24mm f/4 G, Sony E 50mm f/1.8 Mid-Range Lens, Sony
E PZ 18-105mm f/4 OSS, Sony FE85mm f /1.8, Sony FE 35mm f/1.4
4) Panasonic, Nikon and other cameras,
like GH5/GH5S, Nikon D850 Cinema Camcorder like Canon C300 with lens EF-S 10-18mm f/4.5-5.6 IS STM
6. Is AK series compatible with other kinds of quick release plate?
Manfrotto PL501 or other quick release plate with the same dimensions can mount on AK series gimbal.
But because of the different safety design, please take good care of the devices.
7. What is Mechanical Endpoint Range of each axis?
Panning: 360°;Rolling: 360°;Tilting: 230° (for the sake of security of camera)
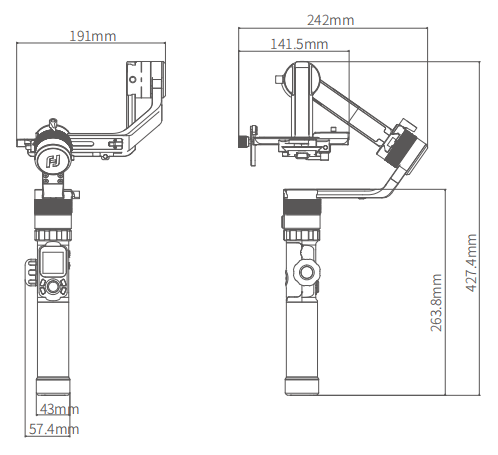
8. What is the weight and dimensions of AK4000?
AK4000 weighs 1436g, not include battery, camera and other accessories.
9. What are the main differences between AK2000 and AK4000?
1) Fixed plate on AK4000 can be moved to left or right, but AK2000 not. It is suggested that
counterweight could be attached to gimbal if balance camera lighter in weight with AK2000.
2) AK4000
has a maximum payload of 4KG, supporting the most popular cameras and cinema cameras, like Canon 5D
series, 1DX, C300, Sony FS5 and RED.
AK2000 has a max payload of 2.8KG, supporting the most popular
cameras, but less compatible with cinema cameras, comparing with AK4000.
3) The tilt axis AK4000 only
could rotate 230°for the sake of security of big camera, so tilt motor should be on the right side of
camera when mount camera on AK4000.
The tilt axis AK2000 can rotate 360°, and tilt motor can be placed
on either side of camera.
4) AK4000 comes with more accessories, comparing with AK2000, like carbon
fiber extension pole and AKF I.
10. Can I switch on gimbal without balancing it with camera installed?
Switch on gimbal without balancing might lead to shorter run time, vibration, high temperature of motor
and other problems. Thus, balance your gimbal with camera installed before turning it on is strongly
recommended.
11. How to balance AK series?
Before switching on AK series, you need to mount camera on it and balance it on three axes: tilt, roll
and pan axes. Another thing is that, if other accessories should be attached to gimbal, like lens support
frame, follow focus, extension support of tilt axis, mount them on the gimbal before balancing. Please
refer to the tutorial for installation and balancing of AK series.
https://www.youtube.com/watch?v=GURE5vzqg5E
12. What is a properly balanced gimbal?
By following steps you'll know the gimbal (it's off) is good to go.
Tilt/Roll axis: place the gimbal
on a stable surface (in upright position), the camera holds at any place no matter where you point it to.
Pan
axis: the vertical arm is in parallel with the ground when you place the gimbal in horizontal position.
Please
refer to the first part of this video to check perfect balance state.
https://www.youtube.com/watch?v=HV4SHFH4wzc
And the balance steps please refer to following video
https://www.youtube.com/watch?v=GURE5vzqg5E
13. Is the motor location interchangeable when mounting camera on AK4000?
The tilt axis AK4000 only could rotate 230°, so tilt motor should be on the right side of camera when
mounting camera on AK4000.
14. After turning gimbal on, it vibrates for 3-5 seconds, and then stops. Is it normal?
After turning gimbal on, short time's vibration happens because the motors match with different cameras
automatically, which is a normal adjusting process. You don't have to adjust motor strength by yourself.
It will work fine after automatically finishing the adjustment.
15. Gimbal is perfectly balanced but keeps vibrating and buzzing, what should I do?
That happens because the value of motor strength is too big for your camera. Please choose an
appropriate setting by touch screen. Alternatively, choose "Auto Adaption" then reboot gimbal in order to
get this function to work.
Please refer to vibration issue 2 of the video below.
https://www.youtube.com/watch?v=HV4SHFH4wzc
16. Gimbal functions properly in upright position, but it vibrates at certain angle or in upside-down
position (buzzing). How to fix it?
Follow these steps to remove vibration.
1) First check whether or not gimbal is properly balanced.
Please refer to Question #12.
2) If gimbal is perfectly balanced, but when it is at certain angle or
in upside-down position, that changes where the center of gravity is, and might cause vibration. So the
suggestion is to check whether or not screws are tightened, support lens frame is just next to the lens,
and the camera touches tilt motor (if possible).
3) If things above is done but vibration still there,
please choose "Auto Adaption" by touch screen, and then reboot gimbal. Please refer to vibration issue 3
included in the following video.
https://www.youtube.com/watch?v=HV4SHFH4wzc
4) If nothing
changes, update Gimbal Firmware V1004 by Feiyu ON App is recommended. Please refer to the attached below.
https://www.youtube.com/watch?v=1Rx7TIZ3agk
17. Gimbal wobbles after switching on, what should I do?
If gimbal is perfectly balance (please refer to Question #13), but move from side to side without noise
after turning on, it seems likely that there is not enough strength from motor to support camera. Please
change the setting of Payload via touch screen, or choose "Auto Adaption" then reboot gimbal to make this
function work.
18. How to adjust motor strength of AK series?
Motor strength can be adjusted by two methods.
1) Change the setting of Payload via touch screen, or
choose "Auto Adaption" or customize. 5 shifts of Payload are listed below.
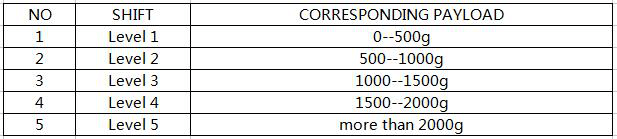
Note:
there might be a deviation from the corresponding payload, choose the right one based on your usage.
2)
Adjust motor strength via Feiyu ON, and save the settings as custom 1/2/3 which then can be found on
touch screen. Alternatively, choose "Auto Adaption" then reboot gimbal to make this function work.
19. How many ways can AK series connect to camera and control it?
1) Shutter release cable: connect AK to camera by shutter release cable, then you can control camera to
take photo by shooting button on gimbal. Part of cameras, like Sony A7M3/ A9, Canon 5D 3/4, 6D2,
Panasonic GH4/5, can be controlled to record by shutter button (camera is in video mode), because the
camera is provided the feature that the shutter of camera is set as a start and stop button of recording.
Note:
recording button on gimbal is only available to WiFi connection.
2) WiFi: choose the corresponding
brand and model of camera in Feiyu ON App then gimbal can connect to the camera by WiFi. The control
function varies with each camera.
Please contact official technical support for further more info.
about control function for different cameras.
20. What are the shutter release cables come with AK series?
Three shutter release cables are provided for Sony S2 interface, Canon N3 interface and Panasonic L1
interface, as shown below.
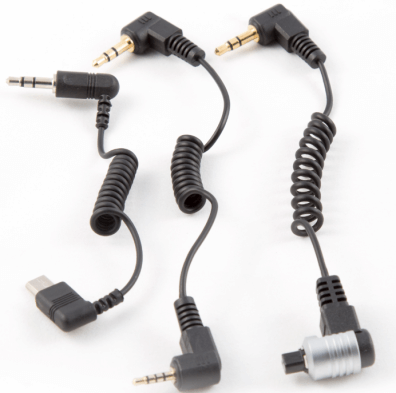
Sony
cameras compatible with the shutter release: Α7 /Α7R /Α7S /Α7M2 /Α3000 / Α5000 /Α6000 /Α6300 /Α6500
/HX300 /RX1R /RX10 /RX100II /RX100M2 /RX100M3 /Α58/ NEX-3NL.
Canon cameras compatible with the shutter
release: EOS 7D, 6D, 5D Series, 1D Series, 50D, 40D, 30D, 20D, 10D. Please note that the cable for Canon
600D, 750D, 80D, 60D, 70D is not included, you can buy it online.
Panasonic cameras compatible with
the shutter release: DMC-FZ50, DMC-FZ50K, DMC-FZ50S, DMC-FZ30, DMC-FZ150, DMC-FZ230K, DMC-FZ30S,
DMC-FZ20, DMC-FZ20K, DMC-FZ20S, LC-1, L1, L10, G10, G2, G1, GF1, GH2, GH4, GH5/5S, G3, GX1.
21. Is there any tips when use shutter release cable?
When connecting shutter release cable with camera and gimbal, please pay attention to the sequence.
The
sequence to power on: connect the shutter release when the gimbal and camera are both off, turn the
gimbal on first, and then the camera.
The sequence to power off: turn the camera off, and then the
gimbal, remove the shutter release.
Note: single tap the shutter button for focus, single tap it again
in 3 seconds to take picture.
For timed photography, when shutter release is connected, please long
press the shutter button on gimbal and hold it for 3 seconds to start timed photography. Camera takes
picture every 5 seconds. The default setting of the interval is 5 seconds, which can be changed via Feiyu
ON App. You can exit this mode by single tapping the shutter button.
22. I can control the camera to take photo by shutter button after connecting shutter release in right
sequence, but why I cannot control the recording by recording button?
Recording button is not available when use shutter release to connect gimbal and camera. It is only
available to WiFi connection. However, part of cameras, like Sony A7M3/ A9, Canon 5D 3/ 4, 6D2, Panasonic
GH4/ 5, can be controlled to record by shutter button (camera is in video mode), because the camera is
provided the feature that the shutter of camera is set as a start and stop button of recording.
23. How to connect gimbal to the camera via WiFi?
Each camera has it own path to activate WiFi function. Just use Sony A7SII as an example:
1)Menu-->Application
List-->Smart Remote Embedded, then WiFi password shows up.
2)Turn on gimbal and bluetooth of your
phone, and connect gimbal to Feiyu ON app.
3)Click "Connect camera", choose the brand and the model of
your camera.
4)Input WiFi password, wait for connection done automatically.
When the app says "WiFi
Connected", and WiFi and camera icons on touch screen of gimbal turn from grey to white, that means WiFi
connection is done successfully, you can turn off Feiyu ON App now.
 Here is the tutorial to connect WIFI between the gimbal and the camera.
https://www.youtube.com/watch?v=_C1JSOG5Nco&t=172s
After first WIFI connection is done successfully , restart the gimbal or camera, you don’t have to
connect it again with APP, just set up the camera to WIFI interface, the gimbal will connect it
automatically for a few seconds.
24. Would I need to input WiFi password in Feiyu ON app every time I make WiFi connection?
The WiFi of gimbal could save password. You just need to input WiFi password in Feiyu ON App for the
first time when make connection. Once WiFi connection built with success, gimbal could reconnect to
camera automatically without Feiyu ON as soon as WiFi function of camera is activated, when you restart
gimbal or camera.
25. Can I turn off Feiyu ON App when WiFi connection is done with success?
Feiyu ON App is just the assistants to build WiFi connection. When connection is done successfully, it
is fine to turn off the App.
26. How to switch shooting modes of the camea and control it to take photos and videos when gimbal
connects to camera via WiFi successfully?
When WiFi and camera icons on touch screen of gimbal turn from grey to white, that means WiFi
connection done with success.
The camera could be controlled to take photos via the shutter button
when the icon of Camera Mode shows the camera is in photo mode. You can have the camera change to video
mode by single tap the recording button, or change shooting mode on the camera.
The camera could be
controlled to record via the recording button when the icon of Camera Mode shows the camera is in video
mode. You can have the camera change to photo mode by single tap the shutter button, or change shooting
mode on the camera.
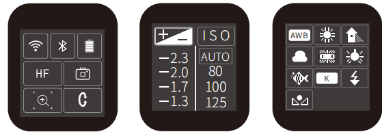
27. What parameters of camera can be changed when WiFi connection is built successfully?
The parameters can be changed are ISO, Exposure and White Balance. Slide touch screen to the right then
you can choose the corresponding parameters.
Parameters can be changed vary with each camera due to
different protocols.
28. Why part of cameras can be controlled to take photo but not to record when gimbal connects to camera
via WiFi successfully?
That happens perhaps part of cameras is not able to be controlled to record via WiFi, for example, Sony
a6000/ RX1R /Canon 6.
29. Does use Feiyu ON App to connect gimbal to camera via WiFi affect wireless function of my phone?
The App just works as a medium for inputting WiFi password of camera. The password will be sent from
the phone to gimbal by bluetooth. That won’t affect WiFi function of your phone.
30. Camera (like Canon 6D Mark II) can be controlled to record by the video button for several times via
WiFi, however it suddenly crashes and prompts err70, but other functions of gimbal work fine. How to fix
it?30
Update the latest version of Canon Keypad firmware via Feiyu ON is suggested. That could fix the bug.
Here is the tutorial shows how to update firmware.
https://www.youtube.com/watch?v=1Rx7TIZ3agk
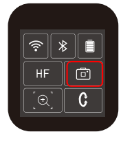
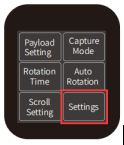
31. How to disconnect WiFi connection of camera?
When gimbal is on, slide touch screen to the left to find the settings. Press and hold trigger button,
push up joystick, then click“Settings”to disconnect WiFi connection.
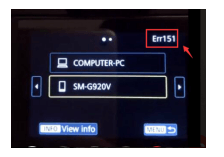
32. When do WiFi connection, the camera prompts err151, how to fix it?
Please reset WIFI (WiFi-clear Setting) then try again.
33. Can I use log mode for shooting while WiFi of the camera is connected?
Log mode is disabled while WiFi of the camera is connected. Please use the shutter cable instead if log
mode is needed.
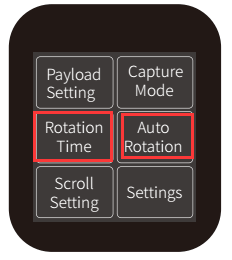
34. How to shoot Motion Time-lapse with AK series?
A Motion Time-Lapse video is created on the basis of pictures shot by the camera that is set to take
pictures at a certain speed with a gimbal that is moving at constant speed.
Here are the steps:
1)Connect
gimbal with the camera via shutter cable and make sure AK could control the camera to take pictures.
2)Find
"Rotation Time" on touch screen, and set up four parameters "PAN", "TILT", "INVL", and "DWELL". Set up
exposure time on the camera as well with the value less than or equal to DWELL. The minimum value of
DWELL is 1 second (2 seconds or above is recommended).
Note: PAN means the movement time on setting
path of panning axis , TILT means the movement time on setting path of tilting axis.
INVL means the
time-lapse intervals, which is set up more value than DWELL.
DWELL means the immobility time to make
the camera exposure ,which is suggested to set up the same value as camera exposure time.
3)Find "Auto
Rotation", follow the prompts on the touch screen to set up initial position and ending position and the
route between two position When set-up is done, gimbal rotates automatically as programmed.
4)The time
remaining shown on touch screen. Gimbal stops at the ending position when auto-rotation is done. Double
click trigger button to reset gimbal.
5) Edit the pictures to timelapse video with some video edit
software.
35. How to shoot Motion Time-lapse at night with AK series?
A Motion Time-Lapse video is created on the basis of pictures shot by the camera that is set to take
pictures at a certain speed with a gimbal that is moving at constant speed. However, a Motion Time-Lapse
at night requires long exposure while taking pictures, so that those pictures are of high quality could
be edited to a video.
Here are the steps:
1) Connect gimbal with the camera via shutter cable and
make sure AK could control the camera to take pictures.
2)Find "Rotation Time" on touch screen, and
set up four parameters "PAN", "TILT", "INVL", and "DWELL". Set up exposure time on the camera as well
with the value less than or equal to DWELL.
In order to determine what exposure time you should use,
it is very important to take some pictures to find the best exposure time for your sample.
The max
value of DWELL is 58 seconds. However, 55 seconds is recommended as the max value of DWELL since the
camera will take some time to save pictures. If DWELL was set at 58 seconds, there will not be enough
time for the camera to save picture but to capture again.
Note: PAN means the movement time on setting
path of panning axis , TILT means the movement time on setting path of tilting axis.
INVL means the
time-lapse intervals, which is set up more value than DWELL.
DWELL means the immobility time to make
the camera exposure ,which is suggested to set up the same value as camera exposure time.
3) Find
"Auto Rotation", follow the prompts on the touch screen to set up initial position and ending position
and the route between two positions. When set-up is done, gimbal rotates automatically as programmed.
4)
The time remainning shown on touch screen. Gimbal stops at the ending position when auto-rotation is
done. Double click trigger button to reset gimbal.
5)Edit the pictures to time-lapse video with some
video edit software.
Here is a tutorial for reference.
https://www.youtube.com/watch?v=H_C5vaccRAk&t=20s
36. Is there any tips for me on set up Rotation Time for a Motion Time-lapse?
Note: PAN means the movement time on setting path of panning axis , TILT means the movement time on
setting path of tilting axis.
INVL means the time-lapse intervals, which is set up more value than
DWELL.
DWELL means the immobility time to make the camera exposure ,which is suggested to set up the
same value as camera exposure time.
When set up those four parameters "PAN", "TILT", "INVL", and
"DWELL", you should follow the rule: PAN and/ or TILT>INVL>DWELL. Otherwise, you will get an error
and have to set up the parameters again.
Besides, when DWELL is given a value greater than ZERO,
gimbal sends a shutter signal to the camera 1 second after it stops rotating. If DWELL was set at 1
second, the camera would take picture while it is moving, pictures took might be kind of blur. Thus, it
is recommended that DWELL is set as 2 seconds or above.
37. Gimbal connects to the camera via shutter release, however, the camera does not take picture when
press the shutter button, what should I do?
Please make sure connect the shutter release cable with the camera and gimbal in right sequence first.
1)
Check whether or not the camera can focus by half-pressing the shutter on the camera, and whether or not
the camera can take picture by fully pressing the shutter. If not, please change the view direction of a
lens to some position from a distance, it will be better to focus. If turn the camera to a mirror or
display screens or something too close, it's hard to focus.
2) Check whether or not you use the right
shutter release. The shutter release cables provided are for Sony S2 interface, Canon N3 interface and
Panasonic L1 interface. The cable for Panasonic L1 port is not adapted to Canon 80D/ 700D.
3) Check
whether or not the shutter release functions properly, and could control focus and photo-taking. Here is
the video to show you how to check if the shutter release is in good condition.
https://www.youtube.com/watch?v=xG2w39SXeYc
4)If both the camera and the shutter release work fine, the problem might be involved with
compatibility. Please check with official technical supports.
38. The joystick can control the camera tilt up or down, but it can not tilt up when at a certain angle,
how to fix it?
If the joystick can control the camera tilt up or down, that means the tilt axis functions properly. It
can't rotate in certain angles, especially vertically upward direction because the motor strength is not
big enough for supporting the camera. Maybe the camera is not well balanced, or you balance the camera
when the lens is not zoomed, and the automatic adaptation motor strength fit for this state. But when
zoom in the lens, that changes the gravity of the camera. The motor strength provided may not support the
upward movement of the camera.
39. When I use the rolling 360 degree rotation function, gimbal will stop at certain angle, how to solve
this problem?
If the gimbal stop at certain angle on roll-controlling, that mainly because the gimbal is not balanced
well before powering on, especially the panning axis, leading to a heavier weight on one side, so the
motor can not support its rotation. Also if the lens is much heavier or quite longer than the camera
body, that may cause this problem, too. Please well balance the gimbal following the tutorial on the
website or APP.
40. The gimbal can stay stable after powering on, but why can’t I control it by joystick?
1) Please check whether or not the contact pin can rebound by single taping them, and if all the pins
are in good condition. We can see the contact pin is already damaged as below.
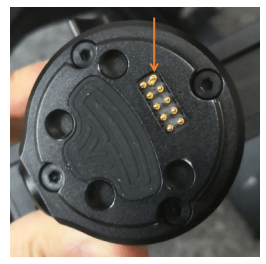
2)
Please turn the gimbal off and pick up the handle part, find soft cloth together with small amounts of
alcohol to clear the contact pad on the top of the handle, as the picture shown, and dry it up.
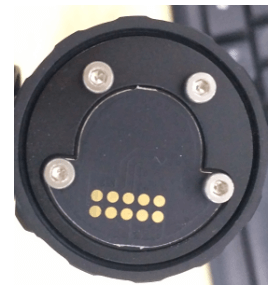
3)Please
try to
update the firmware to check if it would help.
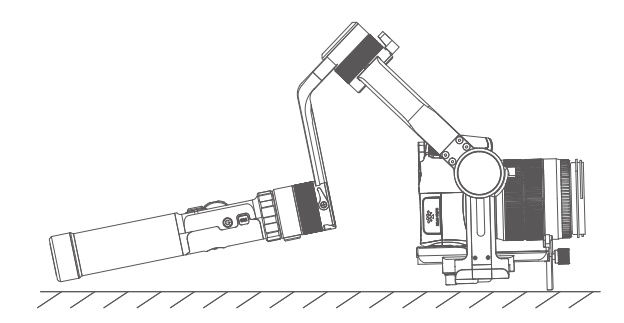
41. How to initialize AK series?
1)Slide the screen left ,then click Settings-Calibration.
2)Put the gimbal on a steady flat, as the
picture shown.
3)The gimbal will automatically check whether be put on a steady flat.
4) After the
screen shows “Calibration Completed”, pick the gimbal up, click ESC on the screen to finish calibration.
5)
Please repeat the steps above if calibration is failed.
42. What kind of issue can be fixed by initialization?
1) When camera is not balance.
2) If not use for a long period of time.
3)In case of extreme
temperature variation